Meditating is actually easier than you might imagine. Most of us have dabbled in meditation by participating in conscious relaxation. Maybe during an exercise class or to manage pain at the dentist or anxiety before a test. We start by paying attention to our breathing.
The practical effort to focus completely on our breathing takes our minds away from the "mind clutter" that constantly tries to invade our mind and eliminate feelings that will lead to a time of calm. With repeated effort the goal of clearing your mind – to think of nothing, does occur and the process of meditation takes on its own energy. The result is serenity, calmness, eventually opening yourself to new insights.
Too much stress, stress reduction, chill out, let it go, detach – familiar phrases to all of us. Our world is fast, fun and exciting. It is also challenging, trying, demanding and frightening. These two sides of our lives produce stress, emotional reactions, anxiety, worry and anticipation. Our bodies and minds can tolerate only so much of any of these. After a while, each of us reaches a saturation point and the results become uncomfortable at best; for some it may be unbearable, even unendurable.
There is no right or wrong behavior during your meditation. It is your time for you. Everyone deserves this kind of personal attention. This is a self-care activity; loving oneself! Teach it to your children instead of a time-out in their room or corner. Teach it to your friends, family, anyone who will listen. We can share this gift and get back as we give. We are all better because of each person who meditates. The peace and joy felt by those who meditate enters the world for all of us as positive energy. From it the world is a better place. Imagine if we all practiced meditation!
Thursday, August 14, 2008
The goal of meditation
Through analytical meditation we shall perceive our object clearly, then through placement meditation we shall gain deeper levels of experience or realization. The main purpose of all Lamrim meditations is to transform our mind into the path to enlightenment by bringing about the deepest levels of realization. The sign that we have gained perfect realization of any object is that none of our subsequent actions are incompatible with it and that all of them become more meaningful. For example, when we have gained a perfect realization of compassion we are never again capable of willingly inflicting harm upon any other living being and all our subsequent actions are influenced by compassion.


We need to meditate on love, compassion, and bodhichitta so that we can overcome our self-cherishing and develop and maintain a good heart towards all living beings. With this good heart we need to meditate on tranquil abiding and superior seeing so that we can eradicate our ignorance and finally become a Buddha by abandoning the two types of obstruction.
We need to meditate on death and impermanence to overcome procrastination, and to ensure that our Dharma practice is pure by overcoming our preoccupation with worldly concerns. If we practise Dharma purely it is not very difficult to attain realizations. By meditating on the danger of lower rebirth, taking refuge sincerely, and avoiding non-virtue and practising virtue, we protect ourself from taking lower rebirth and ensure that life after life we shall obtain a precious human rebirth endowed with all the conditions conducive to the practice of Dharma.
Benefits of Meditation
By practicing meditation, distracting thoughts will subside and we will experience a sense of inner peace and relaxation. Our mind will feel lucid and spacious and we will feel refreshed.
When the otherwise incessant flow of our distracting thoughts is calmed through concentrating on the breath, our mind becomes unusually lucid and clear. We should stay with this state of mental calm for a while.

Even though breathing meditation is only a preliminary stage of meditation, it can be quite powerful. We can see from this practice that it is possible to experience inner peace and contentment just by controlling the mind, without having to depend at all upon external conditions.
When the turbulence of distracting thoughts subsides and our mind becomes still, a deep happiness and contentment naturally arises from within. This feeling of contentment and well-being helps us to cope with the busyness and difficulties of daily life. So much of the stress and tension we normally experience comes from our mind, and many of the problems we experience, including ill health, are caused or aggravated by this stress. Just by doing breathing meditation for ten or fifteen minutes each day, we will be able to reduce this stress. We will experience a calm, spacious feeling in the mind, and many of our usual problems will fall away. Difficult situations will become easier to deal with, we will naturally feel warm and well disposed towards other people, and our relationships with others will gradually improve.
A Simple Breathing Meditation
The first stage of meditation is to stop distractions and make our mind clearer and more lucid. This can be accomplished by practising a simple breathing meditation. We choose a quiet place to meditate and sit in a comfortable position. We can sit in the traditional cross-legged posture or in any other position that is comfortable. If we wish, we can sit in a chair. The most important thing is to keep our back straight to prevent our mind from becoming sluggish or sleepy.

We sit with our eyes partially closed and turn our attention to our breathing. We breathe naturally, preferably through the nostrils, without attempting to control our breath, and we try to become aware of the sensation of the breath as it enters and leaves the nostrils. This sensation is our object of meditation. We should try to concentrate on it to the exclusion of everything else.
At first, our mind will be very busy, and we might even feel that the meditation is making our mind busier; but in reality we are just becoming more aware of how busy our mind actually is. There will be a great temptation to follow the different thoughts as they arise, but we should resist this and remain focused single-pointedly on the sensation of the breath. If we discover that our mind has wandered and is following our thoughts, we should immediately return it to the breath. We should repeat this as many times as necessary until the mind settles on the breath.
MEDITATION
The purpose of meditation is to make our mind calm and peaceful. If our mind is peaceful, we will be free from worries and mental discomfort, and so we will experience true happiness; but if our mind is not peaceful, we will find it very difficult to be happy, even if we are living in the very best conditions. If we train in meditation, our mind will gradually become more and more peaceful, and we will experience a purer and purer form of happiness. Eventually, we will be able to stay happy all the time, even in the most difficult circumstances.

Usually we find it difficult to control our mind. It seems as if our mind is like a balloon in the wind – blown here and there by external circumstances. If things go well, our mind is happy, but if they go badly, it immediately becomes unhappy. For example, if we get what we want, such as a new possession or a new partner, we become excited and cling to them tightly. However, since we cannot have everything we want, and since we will inevitably be separated from the friends and possessions we currently enjoy, this mental stickiness, or attachment, serves only to cause us pain.Such fluctuations of mood arise because we are too closely involved in the external situation.By training in meditation, we create an inner space and clarity that enables us to control our mind regardless of the external circumstances.Gradually we develop mental equilibrium, a balanced mind that is happy all the time, rather than an unbalanced mind that oscillates between the extremes of excitement and despondency.
If we train in meditation systematically, eventually we will be able to eradicate from our mind the delusions that are the causes of all our problems and suffering
Saturday, July 19, 2008
secrets to a flat stomach - II
3. Stable blood sugar is the key
And most importantly, you must stabilize your blood sugar! This is by far the most important factor when it comes to burning away that excess body fat and keeping it off! To effectively stabilize your blood sugar you must feed your body frequently; like every 2-3 hours. The key is to give your body only what it needs at that time. Your body burns calories 24 hours a day, so, why would you only feed it once or twice a day? Give your body the fuel it needs: vegetables, fruits, nuts, berries, whole grains, and lean proteins (chicken, fish, lean beef, eggs, etc.).
Many people are too hung up on how much fat is in food, or how healthy of a choice it is. Calories are calories and it doesn't matter where they come from. If there's extra. where's it going? Yup, you guessed it. body fat!
This is not to say that what you eat is not important because it is, it just doesn't have that much of an affect when it comes to fat loss. Try to make healthy choices whenever possible, but don't feel like if you eat a cheeseburger it is guaranteed to be stored as fat.

4. Get the help of a professional
Unfortunately, most people don't know enough about the human body, nutrition, or effective exercise to meet their health and fitness goals. Ask yourself this one question, "Am I happy with my current progress or condition?" If you're not, you should consider getting the help of a qualified personal fitness professional. Don't depend on the information you get from magazines or from your local gym/ health club. A qualified fitness professional can help you achieve your health and fitness goals, and in less time than you would imagine. If you are serious about your health and fitness goals, and you are ready for that flat stomach, I recommend you start implementing the 4 strategies listed in this article. These 4 strategies can help you take control of your metabolism and burn off that excess body fat and having you looking and feeling great!

Secrets to a Flat Stomach - I
If your goal is to thin your waistline and have a nice flat stomach, the first thing you need to do is decrease / eliminate the layers of fat that are on top of your abs. The most effective way of flattening your stomach is a combination of strength training (with a extra focus on mid-section), cardiovascular exercise (short, hard workouts), and stable blood sugar (keeps you from adding additional fat and makes it easier for the body to use body fat for fuel).
1. You must do some form of progressive strength training
The primary function of the ab muscle is to flex your torso forward. However, there are also muscles that flex your torso to the side and muscles that rotate your torso. Often times you see people on their ab roller every day doing hundreds of crunches or sit-ups.If you want to effectively strengthen your stomach you need to incorporate the following types of exercises:1-2 forward flexion exercises (crunch, sit-up, etc.)1-2 side flexion exercises (side bends, side crunches, etc.)1-2 rotational exercises (trunk rotations, standing twists, etc.)The abs, are muscles just like any other and should be worked at most 3 times per week. You also want to make sure you are training them progressively, working them harder each time.
2. Use short, hard cardio workouts to increase metabolism
Cardio workouts are important because they CAN, if done correctly, increase your metabolism for 4-24 hours or more! This means you are less likely to store any excess calories as body fat because they are more likely to be used by your elevated metabolism. Plus, you are more likely to burn off some excess body fat.Below is a sample interval workout that can be done with just about any activity (walking, bicycling, swimming, stair climbing, etc.).Warm up at easy pace 2-5 minutes then:
- perform 30 seconds of hard work (almost as hard as possible)
- perform 1 minute of moderate work (recovery time-catch breath)
- repeat this process 6-10 times à Cool down at an easy pace for 2-5 minutes
8 pack abs exercise
This simple exercise addresses both the top and bottom of your abs.
Technically the exercise is known as the V Rais/Knee Tuck and this is how it is performed:
1. Lie face-up on the floor with your upper and lower back firmly rooted to the ground and your knees bent at 90 degrees so that your feet are flat on the floor and your arms lie beside your body.
2. Slowly extend your legs so that they are raised from the ground, locked at the knees and at approximately 45 degrees to the level surface. At the same time raise your body to mirror the action of your legs. Pull arms from the floor so they are directly in front of you.
3. Hold this position and draw your left knee to your chest and then extend fully back out. Repeat the motion with your right leg and continue the motion with alternative legs.
This exercise when done slowly and purposefully provides excellent targeting for the upper and lower abdominal muscles.
What is the perfect abs diet?
I would suggest it is one that will efficiently strip away belly fat and replace it with a firm ripped 6 pack of abs.
Would you agree?
The science behind an abs diet would be to eat the correct foods that encourage muscle growth while building in exercise which promotes fat loss and muscle growth.
An ideal abs diet would be very low in fat, quite high in protein to support the additional muscle growth, high in fiber and virtually absent of carbohydrates.
The critical element would be keeping away from the high fat that is found in so many food products. If you can stick to a low fat diet, which would certainly mean no more fast food takeaways, you can really make huge inroads into achieving those ripped abs and a stomach that is flat as a washboard. This said a moderate amount of fat is an important element of diet and is probably obtained through eating fresh fish such as Salmon which is extremely rich in a very beneficial fatty acid called Omega 3.

What about the fiber intake? Again good scientific data suggests a good level of fiber in the diet ensures food moves efficiently through the body. Adding fiber gradually would ensure your body tolerates the increase without becoming completely “congested”. Compliment this with an increase in proteins through either foods that are high in protein or through protein shakes and bars. Taking the natural protein option would include eating foods like nuts, pulses, lean meats such as turkey and chicken. Keeping your cooking options “low fat” through grilling or broiling would of course be a significant advantage.
What’s the best way to curtail your carbohydrate intake?
As with all the food types you need carbohydrates….probably just not in the volumes you’re used to eating. I would suggest you go for an oat meal cereal in the morning to set you up for the day and then try and refrain from eating any more carb’s until lunch. Maybe brown rich coupled with lean beef or grilled fish would provide the perfect mix of low fat high protein, abs diet for the ultimate 6 pack abs.
Friday, May 16, 2008
Exercise Changes Function Of Heart
For the first time researchers are beginning to understand exactly how various forms of exercise impact the heart. Massachusetts General Hospital (MGH) investigators, in collaboration with the Harvard University Health Services, have found that 90 days of vigorous athletic training produces significant changes in cardiac structure and function and that the type of change varies with the type of exercise performed. Their study appears in the April Journal of Applied Physiology.
"Most of what we know about cardiac changes in athletes and other physically active people comes from 'snapshots,' taken at one specific point in time. What we did in this first-of-a-kind study was to follow athletes over several months to determine how the training process actually causes change to occur," says Aaron Baggish, MD, a fellow in the MGH Cardiology Division and lead author of the study.
To investigate how exercise affects the heart over time, the MGH researchers enrolled two groups of Harvard University student athletes at the beginning of the fall 2006 semester. One group was comprised of endurance athletes - 20 male and 20 female rowers - and the other, strength athletes - 35 male football players. Student athletes were studied while participating their normal team training, with emphasis on how the heart adapts to a typical season of competitive athletics.
Echocardiography studies - ultrasound examination of the heart's structure and function - were taken at the beginning and end of the 90-day study period. Participants followed the normal training regimens developed by their coaches and trainers, and weekly training activity was recorded. Endurance training included one- to three-hour sessions of on-water practice or use of indoor rowing equipment. The strength athletes took part in skill-focused drills, exercises designed to improve muscle strength and reaction time, and supervised weight training. Participants also were questioned confidentially about the use of steroids, and any who reported such use were excluded from the study.
At the end of the 90-day study period, both groups had significant overall increases in the size of their hearts. For endurance athletes, the left and right ventricles - the chambers that send blood into the aorta and to the lungs, respectively - expanded. In contrast, the heart muscle of the strength athletes tended to thicken, a phenomenon that appeared to be confined to the left ventricle. The most significant functional differences related to the relaxation of the heart muscle between beats - which increased in the endurance athletes but decreased in strength athletes, while still remaining within normal ranges.
"We were quite surprised by both the magnitude of changes over a relatively short period and by how great the differences were between the two groups of athletes," Baggish says. "The functional differences raise questions about the potential impact of long-term training, which should be followed up in future studies."
While this study looks at young athletes with healthy hearts, the information it provides may someday benefit heart disease patients. "The take-home message is that, just as not all heart disease is equal, not all exercise prescriptions are equal," Baggish explains. "This should start us thinking about whether we should tailor the type of exercise patients should do to their specific type of heart disease. The concept will need to be studied in heart disease patients before we can make any definitive recommendations."
Exercises For Beach Body
As summer quickly approaches, many of us are scrambling to find a workout regimen that will get us the fastest results so we can look good by Memorial Day. The International Sports Sciences Association (ISSA) polled their member database -- nearly 100,000 personal trainers and health professionals strong -- their survey recommended trying the following exercises for each body part to get your best summer beach body:
1. Chest: incline and decline dumbbell presses
2. Back: seated lat rows
3. Lower Back: reverse hypers
4. Abs: v-up super sets with bicycle crunches
5. Legs and Glutes: squats and lunges
6. Shoulders: seated front dumbbell presses
7. Arms: seated dumbbell curls/standing triceps press
8. Combination Move: dumbbell clean and press or walking lunges
A few effective cardio interval exercises to mix-up your aerobic routine include: starburst jumps, step-ups, climbing stairs and jumping rope.
The secret is to be sure to start this today! If you really want to see a difference, you need to give yourself at least six weeks to start seeing results. Seek out a qualified, certified personal trainer to personalize your program and demonstrate how to correctly perform each exercise to maximize your results.
In addition to toning and defining muscles from head-to-toe, Patrick Gamboa, Vice President of Education for the ISSA, says "a realistic, safe, and healthy expectation of what can be achieved with this strength and interval combination routine is a two- to three- pound body fat reduction per week." For a start, Patrick recommends performing a minimum of:
* 1-2 sets
* 8-12 repetitions
* 2-3 times per week.
Summer Health Concerns for Kids
Kleiner explains that you lose about 4 cups of water per hour of exercise, depending on how much you weigh and how much -- and how quickly -- you perspire. A moderate workout in a mild climate will likely result in a loss of 1 to 2 quarts of fluid per hour through perspiration. The more intense the exercise or the more extreme the temperatures, the greater the fluid loss.
“If you don’t replenish your fluid losses during exercise, you will fatigue early, and your performance will be diminished,” says Kleiner. “If you don’t replenish fluid after exercise, your performance on successive days will decay, and your long-term health may be at risk.”
According to the National Athletic Trainers’ Association, says Kleiner, dehydration can impair your physical performance after less than an hour of exercise -- even sooner if you start working out in a dehydrated state. It can also increase your risk of developing symptoms of heat illness, such as heat cramps, heat exhaustion, and heat stroke.
Not Just for Athletes
It’s not just athletes -- even the weekend variety -- who are dehydrated, says Jacob Teitelbaum, MD, author of "From Fatigued to Fantastic!: A Manual for Moving Beyond Chronic Fatigue and Fibromyalgia."
For even the sedentary he suggests: “Simply occasionally pay attention to your mouth and lips. If they are dry, you’re thirsty and need more water.”
Dehydration can be a serious problem for anyone, but children and older adults are at greater risk, according to the Gatorade Sports Science Institute. It offers these tips to avoid dehydration:
--When exercising, drink early and often. Research shows exercise under warm or hot and humid conditions can cause dehydration in as little as 30 minutes. So it’s important to consume fluids not only during and after exercise, but also before a workout or strenuous activity.
--Don’t wait until you’re dehydrated to start drinking. Drinking in a dehydrated state can cause gastrointestinal distress.
--The American College of Sports Medicine recommends that athletes drink enough fluid to fully replace sweat losses during their activity. At a minimum, drink 8 to 10 ounces of fluid every 15 minutes during exercise.
--When active, don’t rely on your sense of thirst. When you are hot and sweaty, your thirst mechanism can shut off quickly and you may not realize you need fluids.
--Drink on a schedule.
--Check the color of your urine. If your urine looks like the color of apple juice, you are probably dehydrated. If it looks more like the color of lemonade, you are probably well hydrated.
Exercising in the Summer Heat
Exercise and Fitness in Summer
"Hot weather is no excuse." That's what Certified Strength and Conditioning Specialist Romeo Cabas of Good Samaritan Health and Wellness Center says.
"Even though the extreme heat and humidity this summer can make exercising more difficult," he explains, "my recommendation is to strive for 30 to 60 minutes of aerobic activity most days of the week to maintain or improve current fitness levels."


Exercising safely requires taking steps to prepare for the heat, according to Cabas. "It's possible to prevent common issues associated with the heat by taking precautions such as drinking water before, during and after a workout and by exercising indoors when possible."
Downers Grove resident Mike Osika, a project engineer, says he prefers working out indoors no matter what the weather is outside. "I exercise to relieve stress," he explains. "I like to work out 6 days a week. It's easier to get an intense workout in air conditioned comfort."
Cabas agrees that air quality is a factor. "In high heat and humidity conditions, for example, perspiration does not evaporate efficiently and it's harder to regulate body temperature," he explains. "To compensate, you may have to 'go easier'Â - slow down or shorten your workout."
According to Cabas, summer exercise safety includes the following guidelines:
- First and foremost, hydrate. Carry cold water with you; drink often. Consider a sports drink with electrolytes if you are working out for more than an hour.
- Monitor your heart rate. If your heart rate goes above your target, slow down or stop to avoid further distress.
- Acclimate your body to exercising in the heat by starting slowly and allowing time to cool down afterwards.
- Avoid exercising outdoors in the high heat and pollution of the day. Instead, try exercising before 10 AM or after 7 PM.
- Exercise indoors in a climate controlled environment such as a health club or indoor shopping mall.
- Dress in light colored clothing because it reflects the heat better then darker colors.
- Wear a hat to protect both eyes and face from excess sun exposure.
- Wear poly-cotton fiber blends, which wick perspiration away from the body, allowing it to evaporate easily.
- Use sunscreen, even on a cloudy day, to protect yourself from skin cancer. The sunscreen should be oil-free, so as not to interfere with the sweating mechanism and the sunscreen should be waterproof so that you do not sweat it off.
- Shower and change clothes soon after exercising to avoid skin irritation.
- Always check with your physician or healthcare provider before starting any new fitness routine.
Thursday, March 6, 2008
How to Walk for Weight Control
Weight is determined mostly by the balance of calories - how many you burn vs. how many you eat each day. To lose weight, you need to increase your activity to burn more and/or eat fewer calories each day.
Calories and Weight
A pound of fat equals 3500 calories. To lose 1 pound a week you will need to expend 3500 more calories than you eat that week, whether through increased activity or decreased eating or both. Losing 1-2 pounds of fat a week is a sensible goal, and so you will want to use the combination of increased activity and eating less that will total 3500 calories for 7 days.How You Burn Calories
Your weight x distance = energy used walking. Time does not matter as much as distance. If you speed up to walking a mile in 13 minutes or less, you will be burning more calories per mile.But for most beginning walkers, it is best to increase the distance before working on speed. A simple rule of thumb is 100 calories per mile for a 180 pound person.Note About the Calories Chart
You burn more calories per mile at very low speeds because you are basically stopping and starting with each step and your momentum isn't helping to carry you along. Meanwhile, at very high walking speeds you are using more muscle groups with arm motion and with a racewalking stride. Those extra muscles burn up extra calories with each step. Running may burn more calories per mile as there is an up and down motion lifting your weight off the ground as well as moving it forward.
Ankle Exercises
Use these exercises to increase ankle range of motion after injury.
All exercises (except The Alphabet) should be performed in sitting with your legs fully extended, knees straight, out in front of you.
Dorsiflexion
1)Pull your foot back toward you (while keeping knees straight) by moving your ankle. Continue until either discomfort is felt or you can no longer pull your foot back.
2)Hold this position for 15 seconds
3)Return to neutral position
4)Repeat above steps 10 more times
Plantar flexion
1)Push your foot forward away from you (while keeping knees straight) by moving your ankle. Continue until either discomfort is felt or you can no longer bend your foot forward.
2)Hold this position for 15 seconds
3)Return to neutral position
4)Repeat above steps 10 more times
Inversion
1)Turn your foot inward by moving your ankle.
Continue until either discomfort is felt or you can no longer turn your foot inward.
2)Hold this position for 15 seconds
3)Return to neutral position
4)Repeat above steps 10 more times
Eversion
1)Turn your foot outward by moving your ankle. Continue until either discomfort is felt or you can no longer turn your foot inward.
2)Hold this position for 15 seconds
3)Return to neutral position
4)Repeat above steps 10 more times
The Alphabet
1)Sit on a chair with your foot dangling in the air or on a bed with your foot hanging off the edge
2)Draw the alphabet one letter at a time by moving the injured ankle and using the great toe as your "pencil."
- Introduction
- Range of Motion Exercises - Non Weight Bearing
- Isometric Strengthening Exercises
- Resisted Strengthening Exercises
- Semi Weight Bearing Exercises
- Full Weight Bearing Exercises
- Balance Activities
How To Make Your Lat Exercises More Effective!
If you opt to do the Lat Pulldowns Behind the Neck, be sure not to drop your head forward or hunch your upper torso forward in an effort to touch the bar to the back of your neck. If you find yourself doing this, generally it will mean that the exercise poundage is too heavy. There are a couple of techniques you can apply o this exercise or any exercise for a particular muscle group which will keep you from using too heavy a weight and having to cheat your way to a completed rep. If you want to make each set of lat exercises 200% more intense, you can do so by:
- Performing 3-5 second contractions and extensions. Both the contraction and extension of the resisting movement should take 3 to 5 seconds on each and every rep in the full range of the muscle action. It is a very good idea to do super low reps from time to time at the rate of 10 seconds in the contraction phase and 5 seconds in the lower phase.
- Total Stop Pauses. On each and every third rep, stop the rep at some particular range of the movement. If you can't, then the poundage is too heavy.
Exercises for acquiring incredible thickness and density in the middle back would include those movements in which the elbows are allowed to travel back, behind the plane of the upper body. These exercises include Barbell Bent Over Rowing (Always pull elbows higher than leveled flat back arched position.) and it's variations. Seated Horizontal Long and Short Pulley Rows with Handles, and Leverage (T-Bar) Rowing. With these particular exercises, there is a slouching effect which is caused by a phenomenon known as flexion-relaxation especially when the body is bent over and not supported. Ideally, the upper body should be kept at a high angle of flexion during rowing motion type exercises.
Another situation that will cause a slouching forward effect while rowing is if the lumbar region is pre-fatigued from previous lower back exercise such as the Close grip "Sumo" squat dead-lift. Therefore, to maintain proper exercise form, it is a very good idea to adapt the interdependency of muscle group principle where you work the lats, and middle back at the beginning of your exercise program and then finish off your back routine last by working the lower lumbar (Erector Spinae Group) with deadlifts and hyperextensions etc.
I have talked to quite a few bodybuilders and they have told me that they just can't get the proper stimulation and pump from their lat exercises. After watching them, I can see why. Most bodybuilders use their biceps too much when doing lat work and should learn to pull with the lats exclusively, bending the arms only when they have top. This can be accomplished very efficiently by using a "false" or thumbless grip, Conway Lat Straps, Power straps or Joe Meeko Power Grips.
These items will take direct bicep action out of the movement (by keeping the palms high on the bar) and allow for more pure pulling with the strength of the lats only. Another way to arouse lat width and thickness is to arouse lat width and thickness is to hold each contraction for a count of six seconds on perhaps every third rep (on Lat Machine Pulldowns, hold the bar at the base of the neck for six seconds), while mentally visualizing yourself squeezing an apple between your rotated shoulder blades.
One of the tricks to force the lats to do more work is by performing what is called scapular rotations. Larry Scott, two time Mr. Olympia describes this rather unique exercise in his new best selling book Loaded Guns. This book can be purchased at: www.biophase.com.
I will now outline a few back training programs for unlocking the Secrets to Rapid Development for strength, width and thickness.
Tips To Improve Your Prone Hyperextensions
Prone Hyperextensions would be another strategy I would suggest using for the lumbar region also while keeping the following commands in mind:
- Slowly arch (non-ballistically) up to where your shoulders are level with your pelvic girdle and down to a 60� angle from a horizontal position to the floor.
- Hold the terminal point of contraction statically for 5 to 30 seconds.
- Lower slowly at a rate of 5 to 30 seconds.
- Keep the back flat, especially at the beginning of this exercise and never allow it to round forward.
Some excellent exercise selections for the long fibers of the upper lats include the classic pullups and lat pulldowns. On these particular exercises, taking a shoulder width grip on the bar tends to use more of the biceps of the arms but will develop the lower fibers of the lats, while a wider than shoulder width grip will activate the upper lat fibers maximally while using less of the bicep muscles of the arms.
Pullups for many bodybuilders (especially those who weight over 175-pounds) or those who have bodyweight fluctuations from day to day) can become a complicated process because the upper torso must maneuver around the fixed bar. The opposite effect is experienced using the free floating lat bar.
 The (late) Vince Gironda, "The Iron Guru", keyed in the bodybuilding world many years ago regarding maximum stimulation of new lat growth and width when he strongly suggested (Vince didn't suggest, he told us) doing pullups to the chest or sternum area. Vince's theory regarding this was and is to this day that the lower the position of the bar, be it the fixed pullup bar or floating free lat bar, relative to the chest or neck, the greater the stimulation on the lat muscles.
It takes quite a while to master the patented Gironda pullup to the sternum so while a bodybuilder is working that exercise to perfection, he (or she) can do Lat Pulldowns where the bar touches the sternum or low pec line. Remember that the upper body is inclined back at 30 degrees from vertical, high arched chest, and try to drive the elbows into the sides of the ribcage. A secret is to keep the elbows out to the sides to activate more lat and less bicep action.
Developing Great Lats
For a great many bodybuilders, proper feel and technique in performing lat work comes later on in their training. Unfortunately for most it is much later. Although thickness is obtained, the width and flair of the lats lag behind. The problem is due to not employing the correct technique in performing the various movements used to widen the lats. The technique is not really natural in nature and requires understanding, and a great deal of practice to master.
The biceps come into play heavily while performing any movements for the back, especially the lats. You cant work the lats without the biceps becoming involved to a very large degree. The secret is to limit the involvement of the biceps as much as possible. Most beginners use almost only bicep strength in performing lat exercises and this limits the results they can expect to receive. The biceps, forearms, and grip must be secondary muscle actions while performing lat movements... not foremost.
The hands must be viewed as hooks or cups that hook the bar. The mind must be focused on the back executing the movement and not pulling with the biceps. For most, this is difficult to do in the beginning as you cannot ignore the fact biceps are pulling muscles and used in any pulling movement. Mind visualization and practice are required in order to perform lat exercises properly for maximum benefit.
Although this technique is to be used on all back and lat movements, let me describe it using the bent over row as an example. Assume the bent over row position. Hands on the bar about shoulder width apart, your feet slightly wider than shoulder width. Keep your knees lightly bent throughout the movement. Bend over at the waist with your upper torso slightly more than parallel to the floor. Now focus on your arms and hands being nothing more than hooks on the bar. Concentrate full on your back and start the movement with your lats, not your arms. Try to make your shoulder blades touch one another.
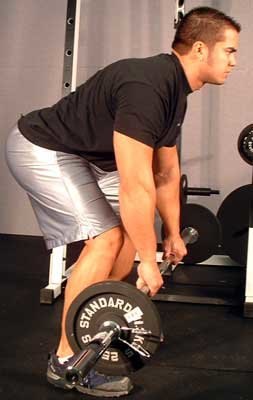
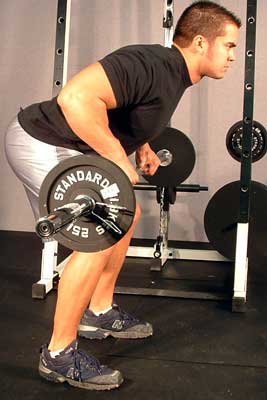
Bent Over Barbell Row.
Your focus must be on the lats doing the work, not the arms. The only way for most bodybuilders to properly perform lat work is to practice form and technique with very light weight. Once you have mastered the technique you can then begin adding weight to your exercises. Many bodybuilders use weights that are far too heavy for performing lat movements correctly. Poor form on lat exercises only places you at higher risk for injury and prevents you from working your lats the way they should be worked.
Chins are the absolute hardest movement to perform properly. Next are bent over rows. Both are excellent lat movements and allow for varied hand spacing to hit all aspects of the lats. You should continue to practice all lat movements using light weights without worrying about anything except your form. So that you will not feel using light weights counter productive to your training, I suggest you follow this giant set routine.
You will have to use light weights to make it thorough and it will give you plenty of practice. After following this giant set for about six weeks you should have the movements down pretty good and can advance to heavier weights and fewer movements per workout.
Begin by thoroughly warming up the lats. I suggest you perform chins for two sets of ten reps. If you are unable to do ten chins dont worry about it and every two sessions try to add one more repetition. Chins are difficult for most and I would not worry about the total number of reps you can actually perform. Just keep working on them. Since this is the warm-up movement, allow yourself about two to two and a half minutes between sets and the start of your workout.
The following movements are to be performed one right after another with no rest in between exercises. Once you have completed all the exercises in the order listed, this will constitute one giant set and you are to rest for two minutes before moving on to your next giant set. Remember; focus on form and not how much weight you can lift. This routine is designed to help you achieve the feel for working the lats.
Accupuncture
........According to the Hindu philosophy, the life force that governs the human body is the basis of every living and non-living entity . This force called "Prana" is continuously circulating along the channels of our body.This 'Prana' which is called 'Chi' in Chinese philosophy controls both universe and human body .
........Everything in this Universe belongs to the five elements i.e. wind, fire, earth, metal and water. These five elements have their two cycles -
1. Constructive
2. Destructive
........Constructive cycle is in harmony which is a balance state of the Universe, and an upset in balance results in natural calamities. A disharmony in balanced state, similarly brings diseases.
........The aim of this therapy is to bring a balance in the body and thus cure any type of disease.
Method - This treatment is carried out by needles, seeds, grains and magnets.
........There are basically two types of treatment in this therapy.
1.Physical
........In physical treatments grains , needles and magnets are placed on certain points of the body that results in immediate relief.
2.Metaphysical
........This is harmonising the five elements by diagnosing in which organ the bioenergy is deficient or excess. And then by means of magnets, seeds and/or needles these organs can be balanced and diseases can be eliminated.
The treatment in this therapy is very safe and there is absolutely no side effects.
Wednesday, February 13, 2008
Hip Toning Exercise
Hip exercises definitely help reduce weight to certain limit but contrary to the myth and the tall claims made by info-commercials, spot reduction of fat is not possible. Fat reduction has been found to be uniform all over the body although accumulation has been found in the mid body first. While exercises such as hip strengthening exercises, hip slimming exercises are found useful in rehabilitation programs they are also applicable in weight management. Hip reducing exercises are important for those who (predominantly in women) have wider pelvis that also accommodates more fat.
While above explained hip workouts are more advisable for those wanting to reduce fat, there are exercises specially formulated for sprinters and athletes for strengthening their hips
Hip Reducing Exercises
There is a wide range of hip slimming exercises varying according to their utilities (benefits) and applicability. We take a look at some of those here.1. Side Lunge Slide
This hip toning exercise works on the gluteus mediums muscle. You can’t do this exercise on a carpet. Smooth floor is better. Stand with feet stretched apart to hip width with one foot on a paper plate. Slide your foot, which is on the paper plate, away sidewise while keeping torso and abs upright. You will need to bend the other knee. Hold it there for a while and get the foot back sliding to original position. Repeat the same for the next foot and then the cycle for 8-10 times. You can rest your hands on your torso.2. Front one legged squat
Stand on a step to begin with. Lift your left leg out forward and slowly begin to squat till the toe of the left foot touches the floor. Touch the floor lightly while keeping the right knee in line with your toes. Now stand up slowly and repeat it 8-10 times. Change legs and repeat for 4-5 sets again.3. Chair squat
Stand in front of a chair with your feet spread to hip width, hold torso straight and abs tight. Slowly bend your knees without spreading until you are almost sitting on the chair. Hold knees behind toes and for balance you can stretch arms forward. Hold there for about 2-3 seconds and then stand up slowly. Repeat for 14-15 times and of 2-3 sets.4. Bullfrog
Bull frog is another of the hip strengthening exercises that also works on thighs. This is not recommended for those of you with joint pains and arthritis. Stand up with feet spread to hip width. Then squat till hips are in the lowest position. Hold there for not more than a second and then in one swift move leap up like a frog does. Repeat this 8-10 times but not on a hard floor to avoid injury. This exercise is also called as squat thrust.While above explained hip workouts are more advisable for those wanting to reduce fat, there are exercises specially formulated for sprinters and athletes for strengthening their hips
Burning Calories
There are many good reasons for exercising regularly, and burning calories is just one of them. The calories burned during exercise depend on the type of exercise, your body weight, the intensity of the exercise, your metabolism and the length of the exercise. Many exercises are particularly good at burning calories, including aerobics and bicycling. This article will show you how different exercises work at burning off calories.
Flexibility and muscle fitness is also important when it comes to exercising, but people who are trying to lose weight will benefit from spending more time in calorie-burning exercises.
Exercise burns calories by using up the energy that is provided by food. Calories become energy in our body. It is either used up (through exercise) or it is stored. When it is stored, it may become body fat. Participating in regular exercises burns the calories, instead of storing them.
Calorie-Burning Exercises:
Every type of exercises burns some amount of calories. Even just breathing uses a certain amount of calories. Performing daily tasks such as walking to work, getting breakfast, doing housework etc, burn calories. However, some types of exercises use up more energy and therefore burn calories at a higher rate.Strengthening Training:
Many people who are exercising solely to lose weight may not spend much (or any) time on strength training exercises under the belief that only cardiovascular exercises will help them burn calories and lose weight. Although cardiovascular exercises will burn more calories per workout, strength training workouts can play a very important role in burning calories. Strength training improves muscle mass, which helps the body burn calories more efficiently. Participating in strength training will help the body burn more calories during other types of exercises.Cardiovascular Exercises:
Cardiovascular exercises are very good at burning calories as they use up a lot of energy. The more intense the cardiovascular exercise, the more calories will be burned. The amount of calories burned will depend on the type of exercise, the length of time, the intensity and your metabolism. Spending some time in strength training will help improve your metabolism so that you burn more calories when participating in cardiovascular exercises.Top Jogging Tips
Get jogging tips from friends or a coach before getting started. Here are some simple tips on jogging.
1. Consulting your physician is important if you are over weight before getting started with jogging.
2. Give up smoking which, in any case, is detrimental to cardiovascular fitness. Smokers get exhausted fast could lead to palpitations.
3. Get a good pair of jogging shoes.
4. Avoid jogging on hilly terrain to prevent injury. Running downhill, you can tumble down injuring yourself.
5. Take longer and steady strides. Land your steps straight without splaying to prevent ankle injury.
6. Avoid bouncing too much and keep yourself erect. Don’t hunch over.
7. Choose a pristine place to jog.
8. Begin slowly and increase speed as you get used to jogging. As a thumb rule, you can step up speed by 10-12 meters a week.
9. Carry a walkman along. Music helps relax the mind.
Jogging
Jogging, the term is not aptly defined unlike other activities or exercises. However, one can say jogging is running at brisk, trotting pace as a form of exercise for burning calories and cardiopulmonary well being. We will the discuss benefits of jogging that you can avail and jogging tips with a section on “how to start jogging” and including jogging gear.
What Is Jogging? Does It Help In Burning Calories?
Jogging is running as a form of exercise that invigorates growth, burning of calories and cardiovascular fitness by high impact on places such as heels and knee joints. Jogging helps burn calories. As per American Council on Exercise, ACE, estimated that a person of 160 pounds weight can burn away 12-13 calories by jogging at about six miles an hour speed. However the rate of calories burning varies with each individual’s weight. There are some interesting statistics that tell us jogging at 5 miles per hr into 15 mph wind increases burning of calorie by 15% as opposed to 5% when you are jogging in opposite direction.A Brief on Jogging Gears
The most important of all is a pair of jogging shoes. The modern biomechanical wonders, jogging shoes, absorb impact shocks reducing risk of injury. The shoes must have good cushioning soles with all round protection, especially to ankles. You must avoid wearing thin shoes and socks to avoid injuries and blisters. Initially, when you begin, you may not need jogging pants but can think of buying after weeks of practice. When it is time to buy jogging pants, jogging shoes and jogging equipments, you can consult your mates. Always buy reputed brands. Although high priced, they payback over time.Benefits of Jogging
Jogging burns more calories than walking as you consume more oxygen per mile you run than walking in addition to the impact factor. Circulation increases briefly as does the heart beat. Once you get seasoned enough, you begin to see benefits of jogging. You won’t find sudden thumping of your heart which gets increased and vital oxygen. Jogging tones muscles too. Perhaps it is the best exercise for overweight people. Because of the impact they can burn more calories from hips, thighs and abdominal area. Rotating the torso as you run gives a smoother stride in addition to strengthening waist muscle.Tips To Improve Stamina
I was always interested in finding ways to increase my stamina so that I can do more physical feats and work harder without getting tired. In my quest, I have found a few exercises which can be really very helpful in this regard.
1. Skipping: Start small. Skip for some time daily - as long as you feel comfortable. Each week try to increase the duration a little.This can have a good effect on increasing your stamina.
2. Running on the Spot: Run on the spot for a set period of time, like 2 minutes to start with. Later as days pass by you can increase it to maybe 5 minutes etc.
3. Swimming: Everybody must be aware of the good effects of swimming. It is a very good exercise. If you make a habit to swim atleast 30 minutes everyday it can do wonders for your stamina.
4. Cycling: This is another very good exercise for increasing stamina vastly. All the above mentioned exercises not only improve our stamina, they come with a wide range of other health benefits too.
5. When working out, keep in mind two things: overload and progression. Overload is necessary to improve stamina, but don't overdo it. If you are getting irritable or depressed, they can be the first signs of fatigue. Progression means to keep on improving.
I hope that I include many of the above exercises in my daily schedule for a long time to come.What about you?
In addition to improving stamina, we also need to have high energy throughout the day to do our work.
hair care tips
- Brush your hair regularly before going to bed each night.
- Wash your hair with a mild shampoo. Use very little but enough to cover hair completely with lather. Use a conditioner to keep hair manageable.
- Avoid brushing wet hair. This will cause the hair to stretch and finally break. Finger-dry, or use a wide-toothed comb instead of a brush to gently remove the knots.
- Restrict blow-drying your hair. The process of blow-drying is harsh on hair as it robs it of moisture.
- Avoid dyes. Use mehandi (henna) instead as a conditioner and colouring agent.
- Take a calcium supplement or drink two glasses of milk a day.
- Always hold hair dryer away from your hair. Direct air from the hair dryer down hair shaft and not directly into the roots and keep it moving.
- After a perm, never brush your hair. Instead comb hair gently.
- Trim your hair once in 7 weeks to avoid split ends.
- Avoid pulling back your hair tightly.
- Never use a rubber band on your hair as it can pull and damage hair considerably.
- Never go out in the sun without having your head covered.
- Stimulate circulation by massaging your head with oil to which some vitamin E has been added. This will make hair soft and silky.
- Never wash your hair with very hot or very cold water.
- Learn to relax. Loss of hair can happen because of stress. Eat foods that are rich in vitamin B, C and E.
- Add iron and minerals in the natural form in your diet.
The Latest Trends In Mens Hairstyles
Today's man hair style can be either long and textured or super short and tight and still be considered trendy and at the height of fashion. Some men's hair styles require gel, mousse or pomade while others don't even need to be combed. The truth is that now more than ever there are numerous ways to achieve a stylish and trendy man hair cut. That means that there are a lot of different styles for men who are looking for the perfect man hair style to choose from.
While the man's hair style is less rigid than it was in the 80s and requires a lot less goo to accomplish, the modern man hair cut is still best served by a little styling. No, you do not need to spend hours in front of the mirror coaxing every strand into place, but a little gel never hurt any man's hair style that I know of.
Here are just a few of the latest trends in men's hair styles and how to style them: " Super short man's hair style. High and Tight, Fade, Spike, Clipper Cut and Crew Cut are just a few of the names given to the short man's hair cut. By far the most popular man's hair style is the High and Tight or Fade. Characterized by a closely cropped clipper cut around the sides and back of the head with just enough hair on top of the head to comb, this man's hair style with its many variations accounts for about 75 percent of all popular styles today. With just a little bit of gel to spike up the top, mess it up a little or finger into place, this man's hair style will only take you seconds to achieve. While you may have to get it cut more often, about every three weeks or so, the ease of styling this man hair cut is what makes it a favorite among busy men today.
" Medium length, textured men's hair style. Today's styles for men have a lot of texture and the same is true for medium-length styles (about 3 to 4 inches). These styles resemble the classic man hair cut of the past, but step it up a notch by using extreme texture and color to bring it all together. Most styles use a great deal of razoring and texturizing with notching scissors. To style this man's hair style pomade usually works best. Work product through dry hair and finger into place.
" Long man's hair style. While most men do not wear their hair down their back anymore, the long man's hair style has made a somewhat shorter comeback. Perhaps the most recognizable example that I can give of this men's hair style is Ashton Kutcher. Long, textured and disheveled, this man hair cut is gaining widespread popularity. Again, this man's hair cut requires a lot of texture and works best with pomade.
As you can see from these few examples, the man's hair style is far from boring. Gone are the days of cookie-cutter barber shop man hair cut. Here to stay is the trendy and styled cuts of today.
General Skin Care and Maintenance:
As early as sweet sixteen, young boys and girls especially the girls are prone in having pimples, blackheads and whiteheads due to hormonal changes and physical developments. After it grows on your face it will leave a dark spot scar that will definitely ruin up your looks and drop down your confidence.
However, here are tips for you to follow and see for yourself the radiance and glow of your facial skin after the nightmare of having pimples!
Cleanse your make-up off thoroughly before going to bed for it may be clogged the pores or cause irritation if you do not do so. If you are so tired from work or school always use ice as face pack for it helps in relaxing and refreshing the face.
Homeroom tip that can be useful too is that mix turmeric powder, cream, sandal powder, gram flour and made a paste and apply to face for half-an-hour once a day before taking a bath for it will keep your face smooth and fresh all day long.
Also, mix a quarter cup of honey with a quarter teaspoon ground cloves and apply on face and leave it for about fifteen minutes then rinse it off.
And here are the unbeatable ways that you should do in order to maintain a beautiful and radiant face. Drink plenty of water and eat balanced diet! Got it?
Most of the time, pimple always attack our skin and just make our lives miserable! Here are pimple treatment basics for you to be guided in clearing those pimples around. All homemade so it is very affordable and really safe against harsh chemicals. First, apply a paste made from nutmeg, pepper and a little water on the pimples and let it dry then wash it off after.
Avoid taking oily foods, sweets, fries and potatoes instead take a lot of fresh fruits and vegetables with your diet. Use only medicated soap by physicians if possible to avoid spreading it then never pinch out your pimples for it may cause scar on your face.
However, if there are pimple scars on your face that makes it dark and dull then you should try bleaching it using the safest way.
Take note that bleaching has chemicals that merge into the skin and lighten facial hair. Scientifically speaking it is not removal of superfluous hair but it makes it considerably less noticeable. The three kinds of bleach are all unkind to skin and its harmful effects vary from person to person.
Homemade recipe for bleaching include a mix of two tablespoons of milk powder, mix in an enough liquid hydrogen peroxide to make thick paste and if hair is very coarse and dark, mix in a drop or two of liquid ammonia. This is considered to be the least harmful way of bleaching since the powder milk in the mixture moisturizes the skin while bleaching, preventing skin burns and other harmful reactions.
The next bleaching way is the powder bleach. Mix the bleaching powder with liquid hydrogen peroxide and ammonia to form a thick paste liquid. Lastly, the cream bleach which is readymade in the markets it is easiest to use yet the most harmful way.
Bleaching to have a fairer skin and a radiant white beauty is not bad at all but make sure you are doing it the safest way to have no regrets at the end. Make sure to take good care of your face and always be hygienic to avoid it getting harm. It is always better to prevent than to cure a facial problem.
Saturday, January 26, 2008
Eye care tips
Here are some easy things you can do to start giving your eyes the loving care and attention they deserve!
Fundamental rule:
Listen to your eyes. Whether they are sore, tearing, itchy or tired, they are sending you a message. Listen to them. If your eyes hurt when you have been working at the computer for too long, stop and take a break. Be receptive to your eyes.
Palming
A simple technique called palming can refresh your eyes when they are feeling tired ( Remember the first rule! ). The term 'palming' was coined by William Bates, the author of 2 books on vision improvement
You just close your eyes and cover them with your palms, resting them on your cheek bones. Make sure you do not put pressure on your eyeballs. Relax and think of pleasant images. A variation is to imagine the 'blackest' black that you can. But the important thing is to keep your mind relaxed. There are more eye exercises available on the Vision Improvement Site.
Computer work
Nowadays, people spend a lot of time in front of the computer screen. Thus it is even more crucial to give your eyes adequate rest. Here are some things you can do:
- If possible, do computer work without wearing your glasses. I know this is difficult for most people but this is enormously beneficial. I can only see the screen about 8-10 inches away, so I move the monitor nearer and shift my chair forward. Now my eyes don't feel as tried as before.
- Look up across the room or out of the window every few minutes. Take a few deep breathes before continuing your work.
- Stop work after every 40 minutes or so. Get up from your seat and take a walk around the place. Palm for a few minutes before going back to face the computer screen again.
- Whenever possible, make use of your distant vision. Extended periods of time spent at the computer can really spoil one's eyesight, as you may have noticed. Seek out opportunites to see things that are far away.
Reading
When you are reading, do try to read without wearing your presciption glasses. Most people will find they can do so at a comfortable distance. Put the material you are reading far away just so that the letters can be seen clearly. Gradually, the distance at which you can read will increase.
Bicep Curl
A similar exercise to the Tricep Curl, the Bicep Curl can help you strengthen and tone your arms. Normally you would use some free weights while doing a bicep curl,there is no reason why you can't use items that are around the house, such as a tin of food or a bag of flour.
For this exercise it is ok to either be sitting or standing. Remember, always stay in your own comfort zone during the exercise and keep good form to do a bicep curl, somove slowly and with smooth movements.
For this exercise it is ok to either be sitting or standing. Remember, always stay in your own comfort zone during the exercise and keep good form to do a bicep curl, somove slowly and with smooth movements.
- Stand upright, or sit on a chair (whichever you find most comfortable while exercising) with your feet shoulder width apart.
- Hold your weights down by your sides with your palms facing forward.
- Slowly and without moving the upper part of your arms, bend your arm and bring the weights up to your shoulders
- Return the weight back to the starting position, keeping the movement nice and slow.
- Repeat this exercise for a further 3-5 repetitions, or more if you feel comfortable.
- Depending on your personal preference you can do the Bicep Curls at the same time with both arms, or alternatively lifting first with one arm and then the other.
Guidelines For Exercising At Home
You don't have to join the gym to be able to exercise. Why not stay in the comfort of your own home and lose weight for good. Below are some suggested exercises that are aimed to get you out of your chair and get a little home exercise. Although you can buy exercise equipment for the home, the only item that may need to be purchased are some dumbbells. These exercises are just a few of many, but will help firm, tone and keep you active. They will leave you able to carry out your daily tasks more easily. The exercises below are ideal for anyone who is new to exercise at home.
Mobility Improvement Exercises
It's a good idea to check with a health professional and ask their opinion before undertaking any exercise, especially if it has been a while since you have undertaken any fitness program or exercise.
- Start off gently, and work within your comfort zone. Increase your effort gradually over several weeks.
- Maintain regular breathing throughout the exercises, try not to hold your breath - your muscles will need that oxygen!.
- Try to keep strict form with control, not using momentum.
Do not undertake any exercise if you are in pain or feeling unwell. If you feel faint, dizzy or unwell while exercising stop immediately.
Mobility Improvement Exercises
Exercises to improve mobility of the neck, shoulders, hips and ankles. Great exercises for those right at the start of their exercise program.
Tuesday, January 15, 2008
Eye Exercises
The yoga practitioners attach special importance to eye exercises, for two reasons.
Firstly, a lot of eye problems in later life are due to a loss of tone in the eye muscles. These muscles become rigid, and this loss of elasticity reduces the ability of the lens of the eye to focus at different distances. It also causes the eyesight to become weaker. These exercises tone the eye muscles up and keep them elastic. If you already have eye problems when you begin these exercises, you will find your eyesight improving after a few months.
Secondly, any eye tension present will tend to produce a general feeling of tension, due to the eye's connection to the brain via the optic nerve. What happens is that eye tension produces an increase in the nerve impulses in the eye muscles. This increase in nerve impulses travels along the optic nerve and bombards the brain, causing a general feeling of tension and anxiety. The eye exercises will reduce tension in the eye muscles, as well as reduce general tension.
It is best to do these eye exercises while lying down after you've finished the asanas. This way you're resting after the asanas and doing the eye exercises at the same time, thus reducing the time taken to do your yoga routine.
When doing the eye exercises keep your eyes open and don't move your head.
Sitting (as in the exercises for the neck given above), open your eyes, then check on your posture. Is your spine erect? Hands on the knees? Body relaxed? Head straight? That is how you should always remain while doing eye exercises. The whole body must be motionless; nothing must move except the eyes.
Raise your eyes and find a small point that you can see clearly without straining, without frowning, without becoming tense and, of course, without moving your head. While doing this exercise look at this point each time you raise your eyes.
Next, lower your eyes to find a small point on the floor which you can see clearly when glancing down. Look at it each time you lower your eyes. Breathing should be normal. In other words, you don't have to do deep breathing.
Exercise 1
Move your eyes upwards as far as you can, and then downwards as far as you can. Repeat four more times. Blink quickly a few times 1 to relax the eye muscles.
Exercise 2
Now do the same using points to your right and to your left, at eye level. Keep your raised fingers or two pencils on each side as guides and adjust them so that you can see them clearly when moving the eyes to the right and to the left, but without straining.
Keeping the fingers at eye level, and moving only the eyes, look to the right at your chosen point, then to the left. Repeat four times. Blink several times, then close your eyes and rest.
Exercise 3
Choose a point you can see from the right corner of your eyes when you raise them, and another that you can see from the left corner of your eyes when you lower them, half closing the lids. Remember to retain your original posture: spine erect, hands on knees, head straight and motionless.
Look at your chosen point in right corner up, then to the one in left corner down. Repeat four times. Blink several times. Close the eyes and rest.
Now do the same exercise in reverse. That is, first look to the left corner up, then to the right corner down. Repeat four times. Blink several times. Close the eyes and rest.
Exercise 4
This exercise should not be done until three or four days after you have begun eye exercises given here.
Slowly roll your eyes first clockwise, then counterclockwise as follows: Lower your eyes and look at the floor, then slowly move the eyes to the left, higher and higher until you see the ceiling. Now continue circling to the right, lower and lower down, until you see the floor again. Do this slowly, making a full-vision circle. Blink, close your eyes and rest. Then repeat the same action counterclockwise.
Do this five times then blink the eyes for at least five seconds.
When rolling the eyes, make as large a circle as possible, so that you feet a little strain as you do the exercise. This stretches the eye muscles to the maximum extent, giving better results.
Exercise 5
Next comes a changing-vision exercise. While doing it you alternately shift your vision from close to distant points several times.
Take a pencil, or use your finger, and hold it under the tip of your nose. Then start moving it away, without raising it, until you have fixed it at the closest possible distance where you can see it clearly without any blur. Then raise your eyes a little, look straight into the distance and there find a small point which you can also see very clearly.
Now look at the closer point-the pencil or your finger tip then shift to the farther point in the distance. Repeat several times, blink, close your eyes and squeeze them tight.
Exercise 6
Close your eyes as tightly as you possibly can. Really squeeze the eyes, so the eye muscles contract. Hold this contraction for three seconds, and then let go quickly.
This exercise causes a deep relaxation of the eye muscles, and is especially beneficial after the slight strain caused by the eye exercises. Blink the eyes a few times.
Exercise 7
This exercise is called 'palming' and is very relaxing to the eyes. It is also most important for preserving the eyesight. Palming also has a beneficial, relaxing effect on your nervous system.
It's an ideal way to finish off the eye exercises.
Remain seated on the floor. Draw up your knees, keeping your feet on the floor and slightly apart. Now briskly rub your palms to charge them with electricity and place the cupped palms over your closed eyes. The fingers of the right hand should be crossed over the fingers of the left hand on the forehead. The elbows should rest on your raised knees and the neck should be kept straight. Don't bend your head. Do the deep breathing while palming your eyes.
If you are going to do the palming for longer than a few minutes, better sit down at a table, place some books or pillows in front of you to support your elbows so that you will be able to keep the neck straight, and palm the eyes in this position. If the palming is done for only a short period one can do deep breathing for half a minute or so at first, gradually increasing it every week.
Benefits:
This exercise helps to do away with eye strain, and tension. Your vision will get better and clearer as the ophthalmic, or eye, nerves receive a richer supply of blood. Some people use this to improve their vision.
Subscribe to:
Comments (Atom)